WireGuard is very fast and modern VPN quite easy to set up either at the server side or client side. Here, in this quick tutorial, we will explain how to set up WireGuard as VPN to Internet exit point for secure anonymous browsing.
It is also an introductory article into our new WireGuard Quick Start document, for setting up WireGuard based VPN for Green Screen Terminal Services.
A quick intro
The main purpose of VPN is to allow a remote client to securely connect into an internal network at a remote location through the internet. The simplest example is an employee working from home to connect into a company internal network. VPN enables a secured encrypted tunnel through the Internet, protecting the data from spying eyes.
Another purpose quite commonly used today is a VPN service providers for secured Internet browsing without revealing your original IP address. An extensive list of VPN service providers and their rankings can be found here.
WireGuard is one of such products which can give you such functionality completely for free. If installed in Google Cloud Free-Tier configuration, one might get a thoroughly free VPN service. For small amount of monthly cost less than 10USD, one can get its own server in Switzerland.
Why Switzerland?
Switzerland is known as banking country, with strict data privacy, which makes Switzerland the best choice for multibillionaire to keep their money. Data privacy is the core of their banking business, and it extends to the Internet privacy also. Servers located in Switzerland are under similar strict privacy laws, which makes VPN companies putting their servers in Switzerland for a reason.
Now, you know why and how to get your private safe browsing for free or almost free if using servers in Switzerland.
So, how to set up WireGuard as VPN exit point to the Internet?
Basic principle
To set up WireGuard, a few parameters are required.
- Public/Private keys - one line Base64 encoded strings
- Endpoint IP - a WireGuard server address (that one running in Switzerland :))
- VPN network private IP address - for internal network
- DNS name server - used by endpoint to map URL domains to IP's
- A few Linux network settings for routing tables
NOTE: Install WireGuard first by following instructions on WireGuard installation page.
Configuration steps
First step is to create 2 pairs of public/private keys. Then use server private key and client public key on server side, and client private key and server public key on client side of configuration.
The command to generate keys is available after WireGuard is installed on your system.
wg genkey | tee wg0.priv | wg pubkey > wg0.pub
wg genkey | tee cli.priv | wg pubkey > cli.pub
Second step is to determine real network interface name and local network IP range used on server side. Local address is required so that we can set a unique IP address in the same range on client side. When a Client connects through VPN, the new IP address will be visible on the server side just as another computer in the local network.
Even, we can use different network range to isolate client IP from server internal network, existing to the Internet will require even more complex routing table settings. For this tutorial and personal use of VPN, this setting is enough.
To detect server local address range and interface name, use ifconfig Linux command as shown here.

As one can see, internal IP is 10.172.0.3, so we need to take the first free, non-used IP in that range. In our case it will be 10.172.0.5. That address will be the local IP address of our client inside the remote network.
The third step is to enable IP forwarding in Linux system, a WireGuard server.
Open sysctl.conf file and enable or add net.ipv4.ip_forward = 1
sudo vi /etc/sysctl.confAfter save and exit, reload configuration with
sudo sysctl -pThe fourth step is to add a routing table and firewall rules on a WireGuard server. Notice ens4 value, this is real interface name on our Linux Server, as shown at ifconfig image above.
sudo iptables -t nat -A POSTROUTING -o ens4 -j MASQUERADE
sudo iptables -A FORWARD -i wg0 -j ACCEPT
sudo iptables -A FORWARD -o wg0 -j ACCEPT
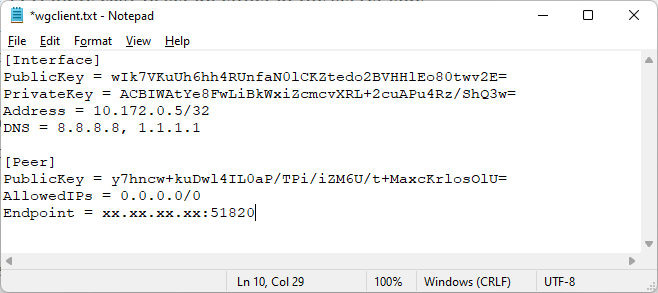
The fifth step is to create a server and a client configuration files with required data. Do not forget that client public key and server private key goes to into server config, while client private key and server public key goes into client config.
Endpoint - is an IP address of our WireGuard server. The one you will install in Switzerland ;)
AllowedIPs - parameter inside client config is an IP address range used by WireGuard client to forward data through a VPN channel. If 0.0.0.0/0 is used, it simply means "all communications".
Optionally, additional commands can be executed when interface is up or down through PostUp and PostDown parameters. In this case, we are automatically adding or removing firewall rules.
NOTE: Server-side config must be saved in /etc/wireguard/wg0.conf

The sixth step is to start services at the client and server side. At the client side, simply load configuration from the created file and select Activate (after server is started).
At the server-side use wg-quick Linux command installed when WireGuard is installed
sudo wg-quick down wg0 && sudo wg-quick up wg0
Last step is to verify our VPN is working correctly. Simply open one of the websites for detecting your computer address. Instead of seeing your computer IP, you should see IP address of your WireGuard server (in Switzerland).

Final word
We hope you will find this quick step useful. For more details and few more tricks where some additional setups can be found, please head on to our WireGuard Quick Step document.
Happy VPN browsing and stay safe....